Monday, December 29, 2014

Paintings from 2014

"Painting is the from the chaos of the emotions to the order of the possible." -Balthus

So, this is my second year of doing a end of the year painting review.  Enjoy!


January: Olympic Torches in Oil


April: Spring Blossoms in Acrylic


May: Super Hero Trio in Acrylic


June: Hank the Ballpark dog in Acrylic done at a paint bar


July: Bridge over water in acrylic done at a paint bar


October: White Pumpkin in acrylic


November: Olaf in acrylic


December: Minion(s) in acrylic


December: Winter Lamp Post in acrylic

Tuesday, December 23, 2014

Last minute wine glass gift

"Christmas is the keeping-place for memories of our innocence." -Joan Mills

Looking for that last minute gift?  There is nothing like a bottle of wine and a personalized wine glass.  This one reads "He sees you when you're drinking". How perfect for the holiday season.

Materials:

  • Wine Glass
  • Red Enamel Paint
  • Paint Brush
Directions:
  1. Paint the words "He sees you when you're drinking" onto the glass. Let dry overnight.
  2. Bake in the oven at 250 degrees for 30 minutes.
It is so simple!  Add a mini bottle of wine inside the glass and it is perfect!


Monday, December 22, 2014

Snowman Salt and Pepper Shakers

"A Christmas candle is a lovely thing; It makes no noise at all, but softly gives itself away; While quite unselfish, it grows small."  -Eva K. Logue

Looking for a fun craft project to make with kids? Try these easy salt and pepper shakers.  The salt and pepper shakers came from the dollar tree.


Materials:

  • Salt and Pepper Shakers
  • White Paint
  • Orange Polymer Clay
  • Black Puff Paint
  • Two Different Colors of Yarn
  • Buttons
  • Crochet Hook
  • Paint Brush
  • Hot Glue Gun
Directions:
  1. Paint the shakers white. Let dry. 
  2. While waiting crochet a tiny scarf for each of the shakers.
  3. Dot the eyes and the mouth with the black puff paint. Let dry.
  4. Make tiny carrot noses and bake according to the clay directions.
  5. Glue nose onto the snowman.
  6. Glue the scarf onto the snowman. Glue the button onto the cross section of the scarf.  
The one with the black button makes the most sense for the pepper shaker.  Do whatever makes the most sense to you.

Sunday, December 21, 2014

Candy Cane Vase

"I wish we could put up some of the Christmas spirit in jars and open a jar of it every month." -Harlan Miller

I have missed two days this month already, so it is the 22 crafts til Christmas blog, but I think I have enough to finish out the task.  Here is a simple one for the day.


Materials:
  • Small Glass Vase
  • Candy Canes
  • Hot Glue Gun
  • Green Ribbon of String
Directions:
  1. Glue candy canes to the vase.
  2. Tie decorative bow onto it.
That is it.  Add floral elements for finishing touches.


Friday, December 19, 2014

Two for one: Wheatley and Pikachu ornaments

"A man wrapped up in himself will always suffocate. But his loved ones forever hold in their hearts the memory of that Christmas." -Bauvard, Some Inspiration for the Overly Enthusiastic

Pikachu

Materials:

  • Gold ornament
  • Black. red, and white paint
  • Paint brushes
Directions:
  1. Paint two black oval eyes.  Paint the mouth/nose. Let dry.
  2. Paint Red cheeks. Let dry.
  3. Paint on white pupils. Let dry.
Wheatley

Materials:
  • White ornament
  • Blue and white paint
  • Black Puff paint
Directions:
  1. Paint a blue circle in the middle of the bulb. Let dry.
  2. Outline details in black puff paint. Let dry.
  3. Paint a white circle in the middle of the clue circle. Let dry.

Thursday, December 18, 2014

Star Earrings

"Christmas, children, is not a date. It is a state of mind." -Mary Ellen Chase


Materials:
  • Yellow Polymer Clay
  • Black Polymer Clay
  • White Polymer Clay
  • Toothpick
  • Earring loops
Directions:
  1. Mold two yellow stars out of clay.
  2. Mold a 4 small black ovals.  Attach two per star for eyes.
  3. Mold 4 tiny white balls.  Attach to the pupils.
  4. Using a tooth pick to poke holes through the top of the star.
  5. Bake in oven for 15 mins at 250 degrees.
  6. Attach to earrings.

Wednesday, December 17, 2014

Boo ornament

"Everyone wants a Christmas tree. If you had a Christmas tree Santa would bring you stuff!  Like hair curlers and ... shoes." -Janet Evanovich, Visions of Sugarplums


Materials:
  • Christmas Bulb Ornament
  • Red, White, and Pink Paint
  • Black Puff Paint
  • Paintbrush
Directions:
  1. Paint bulb white (if not white already). Let dry.
  2. Paint red mouth on. Let dry.
  3. Paint pink tongue. Let dry. 
  4. Draw on black eyes, top of mouth, and arms. Let dry.
  5. Paint on teeth and pupils with white paint. Let dry.
Classic Boo for your Beau.


Tuesday, December 16, 2014

Olaf and Minion Christmas Paintings

"It snowed last year too: I made a snowman and my brother knocked it down and I knocked my brother down and then we had tea." -Dylan Thomas, A Child's Christmas in Wales

With the popularity of Frozen and the Despicable Me movies there is likely to be a child (or a late 20 something friend) who would love getting one of these paintings.  

Materials:

  • Canvas Panels
  • Acrylic Paint
  • Paint Brushes
  • Pencil
Directions:
  1. Paint the background of the paintings. Let dry.
  2. Using a pencil, lightly etch the outline of the image you want.
  3. Paint the image the colors you want.
  4. Paint details over it.
  5. Paint any finishing touches.  Let dry.
  6. Frame if desired.

Sorry for the blurry Olaf, but you know he is always on the move. So, do you want to build a snowman? (Or paint a minion?)

Monday, December 15, 2014

Prayer or Worry Stones

"When we recall Christmas past, we usually find the simplest things-not the great occasions- give off the greatest glow of happiness." -Bob Hope

Christmas is a time to pray and hope for things for the next year. Use these to help you focus on your prayers.


Materials:

  • Polymer Clay
  • Tooth picks
Directions:
  1. Mix different colors of polymer clay together.  Shape into the rock design you want.
  2. Write the phrase or word you want to focus on into the clay using the tooth pick.
  3. Bake at 250 degrees F for 10-15 minutes.

Sunday, December 14, 2014

Pointsetta Leaf Flowers

"There are some wonderful aspects to Christmas. It's wonderful.  And each year, from at least November, well, September, well, if I am honest, May, I look forward to it hugely." -Miranda Hart, Is it Just Me?

Pointsetta's are the flowers of the season.  If you have some silk leafs left from fall, these are easy to make and put int between ornaments can jazz up a Christmas tree.  You can also use the flowers to decorate napkin rings, or make a bunch for a floral arrangement.  


Materials:
  • Red and Green Floral Leafs
  • Pipecleaner or Wooden Skewer
  • Floral Tape
  • Hot Glue Gun
Directions:
  1. Glue one end of the leaf to the end of the skewer.  Fold leaf in one third and glue in place.  Roll leaf onto itself.  
  2. Glue the leafs onto each other in alternating patterns.  until you have the shape of the flower you want.
  3. Glue some green leafs to the bottom of the flower. 
  4. Wrap the skewer (or the pipecleaner) in floral tape.

Enjoy Straight No Chaser as you are crafting!  

Saturday, December 13, 2014

Stormtrooper ornament

"A lovely thing about Christmas is that it's compulsory, like a thunderstorm, and we all go through it together." -Garrison Keillor, Leaving Home


Materials:
  • White Felt
  • Black Felt
  • Polyfil
  • Needle and Thread

Directions:
  1. Fold white felt in half and cut out the stormtrooper helmet.
  2. Cut out the black felt helmet pieces.
  3. Sew the black felt pieces onto one of the white helmet pieces.  
  4. Sew the two pieces of felt together, leaving a small opening.
  5. Stuff the ornament with polyfil.
  6. Sew the rest back together.  
  7. Attach to the tree with an ornament hook.


Thursday, December 11, 2014

The Glass Castle Geodes

"I lived in a world where at any moment could erupt into fire.  It was the sort of knowledge that kept you on your toes." -Jeannette Walls, The Glass Castle

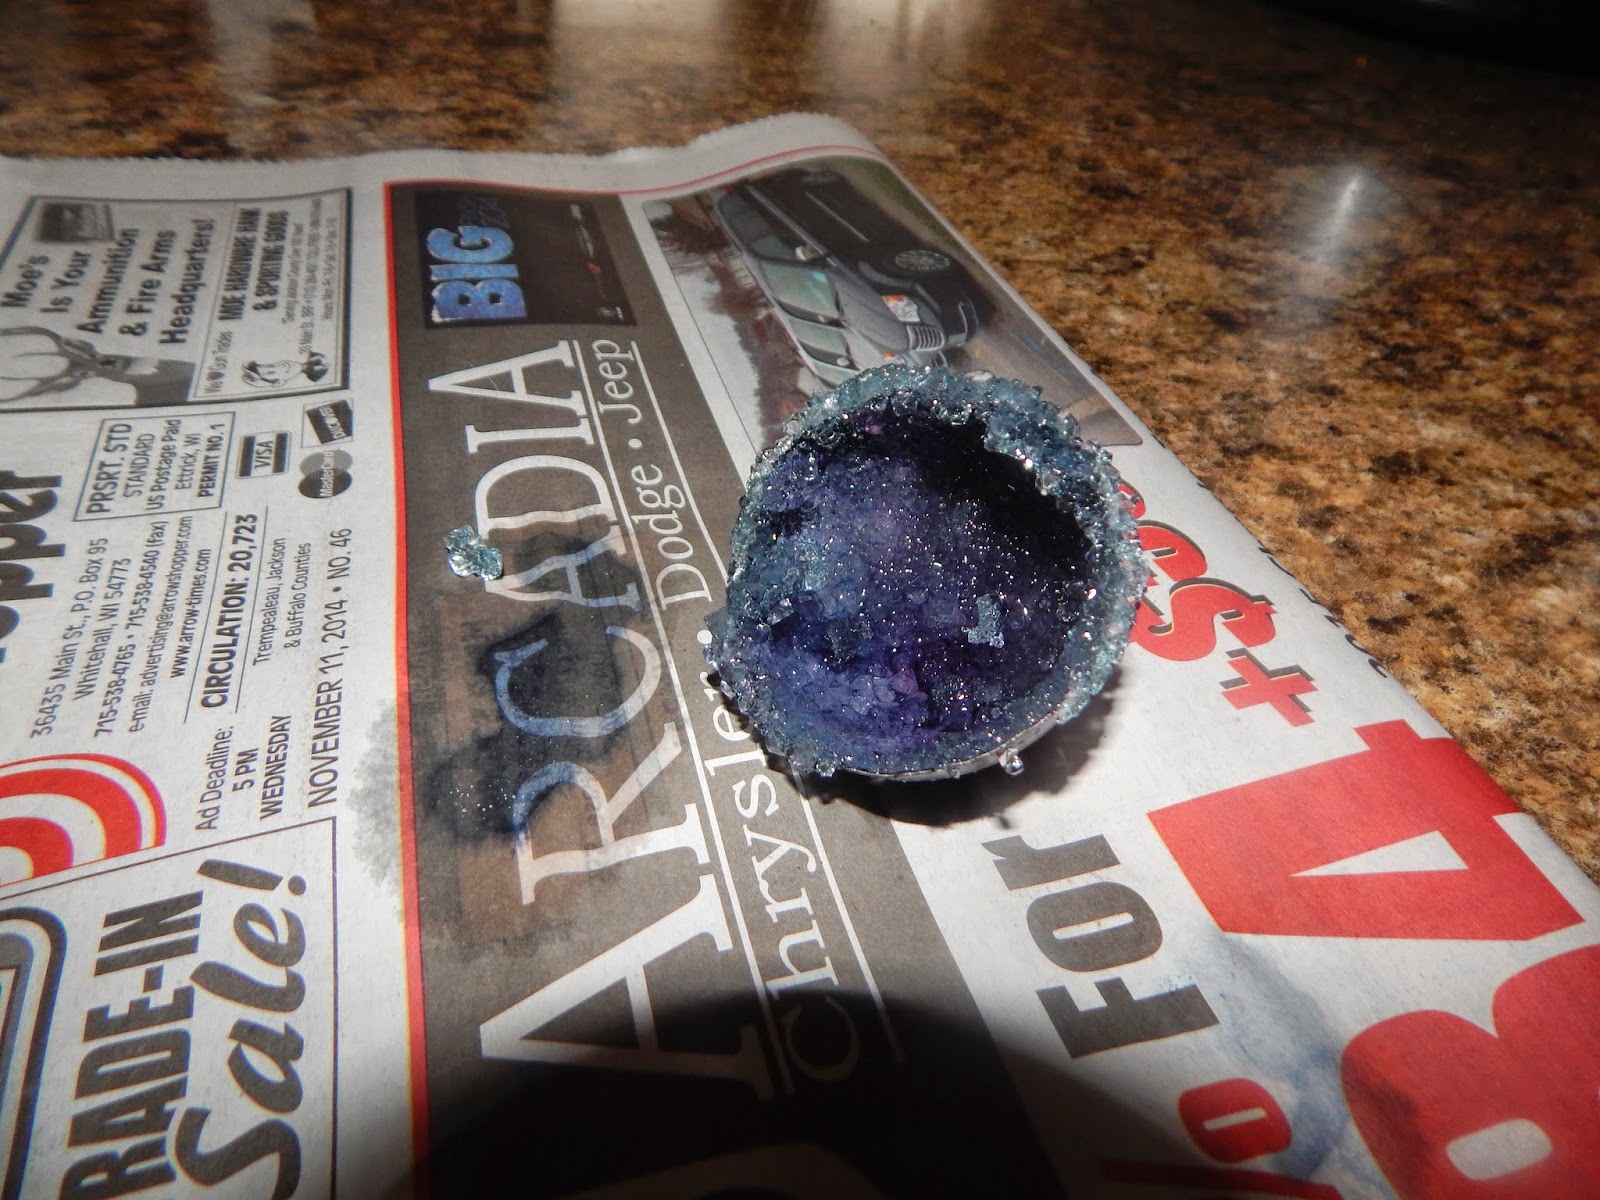
The Glass Castle by Jeannette Walls was this months book club pick.  The story is about Jeannette's unconventional life growing up in a family that made do with what little they had.  Jeannette brings humor and a personal strength to her stories.  One of her prized possessions was her geode that she found.  Her rock collection was her treasure, and since I am not going to find a geode buried in the frozen ground, I decided to make my own geode.  


Materials:

  • Egg Shell (blown out and cut in half, preferably the long way)
  • Alum Powder
  • Elmer's Glue
  • Paint Brush
  • Plastic Cup
  • Food Coloring
  • Water
  • Craft Stick for Stirring
Directions:
  1. Using the paint brush, cover the inside of the egg shell with a thin layer of glue.  Cover that with a layer of alum powder.  Let dry overnight.
  2. In a plastic cup add 40 drops of food coloring of your choosing.  Heat up water to just below boiling.  Add 3/4 cup of water to the plastic cup.
  3. Add 1/4 cup of alum powder to the water solution. Stir to dissolve the alum powder.  Heat in the microwave to dissolve any of the crystals left in the cup.
  4. Add the egg shell to the cup with the inside facing up.  Let sit 12-15 hours.
  5. Remove the egg shell and let dry on newspaper.
The geodes turned out pretty cool!

Wednesday, December 10, 2014

Final Fantasy Etched Glassware

"Christmas is doing something a little bit extra for someone." -Charles M. Schulz


Looking for a geeky Christmas present for a gamer in you life?  These glasses can be made based on any game or interest.  

Materials:
  • Set of glasses
  • Printer labels
  • Scissors
  • Glass Etching Cream
  • Paint Brush
Directions:
  1. Print image on the label.
  2. Cut out the design to create a stencil.
  3. Place label on the glass.  Press flat and remove any bubbles.
  4. With the paint brush apply the Etching cream on the glass.  Follow the directions on the etching cream.
  5. Let air dry.


Tuesday, December 9, 2014

Ghostbusters ornament

"Christmas is a necessity.  There has to be at least one day of the year to remind us that we're here for something else besides ourselves." -Eric Sevareid


With Ghostbusters III in the works,  this ornament can be used for Christmas, Halloween, and the upcoming movie.  

Materials:

  • Green bulb ornament
  • White, red, and black paint
  • Black puff paint
  • Paint brush
Directions:
  1. Paint a black circle in the middle of the ornament. Let dry.
  2. Paint a red outline around the black circle. Let dry.
  3. Paint the white ghost on the ornament. Let dry.
  4. Paint the red slash over the ghost. Let dry.
  5. Using the black puff paint add an outline and details to the ghost. Let dry and then hang on the tree.

Monday, December 8, 2014

Light Bulb Vase

"My idea of Christmas, whether old fashioned or modern, is very simple: loving others. Come to think of it, why do we have to wait for Christmas to do that?" -Bob Hope


Want to make a simple unique vase for friends or family?  Try making it out of a light bulb!  If you haven't replaced your old light bulbs with energy efficient one, whats a better reason than crafting?  

Materials:
Light Bulb
Cloth
Pliers
Salt
Polymer Clay

Directions:
1. Follow the directions over at not normal to remove the parts of the light bulb. 
2. Using polymer clay create a circle for the base of the light bulb. Bake for 15 minutes at 350 degrees. Let cool.
3. Place bulb in circle.

The cool thing is it can be used like all vases. So get creative with flowers, a terrarium, sand, candles, ect.


Sunday, December 7, 2014

Video Game Controller Plush Ornament

"One of the most glorious messes in the world is the mess created in the living room on Christmas day. Don't clean it up too quickly." -Andy Rooney

This was one of the very first ornaments I made for my Geeky Christmas tree.   It could have used some more work, but it does remind me of an old school Nintendo controller.  

Materials:
  • Red, Black, and White Felt.
  • Needle and Thread
  • White and Pink Embroidery Floss
  • Scissors
  • Polyfiber
Directions:
1. Cut out two large rectangles of white fabric. Cut out four small rectangles and two small squares with the white felt. 
2. Cut out a rectangle of black fabric slightly smaller than the white rectangle. 
3.  Cut out two tiny red circles to fit inside the small squares. 
4. Sew the small white rectangles onto the black felt in a line directly left of the middle.  Sew the two small circles onto the black fabric to the right of the rectangles and towards the bottom.
5. Sew the red dots onto of the white squares.
6. With the white floss embroider a small cross to the left of the middle rectangles.
7. With the pink floss embroider six small pink lines above the red buttons.
8. Sew the black rectangle onto one of the large white felt rectangles.
9. Sew the two white pieces together leaving a small opening on one end.
10. Stuff with polyfiber. Finish sewing together.
11. With the white embroidery floss create a small loop at the top of the ornament. 

Fun to give to any gamer in your life.  


Saturday, December 6, 2014

Shrinky Dink Earrings

"It's the little details that are vital.  Little things make big things happen." -John Wooden


Looking for a fun project for the whole family?  Let me suggest shrinky dinks!  Whether you turn them into magnets, key chains, or these adorable earrings, they are fun to make and entertaining for all ages.

Materials:

  • Shinky Dink Plastic
  • Earrings
  • String
  • Sand Paper
  • Pencil
  • Colored Pencils or Sharpies
  • Hole punch
Directions:
  1. Sand one side of the Shrinky Dink plastic until it is evenly rough.
  2. Draw or trace an image onto the rough side of the plastic.
  3. Color in the image.
  4. Using the hole punch, punch a hole in the top of the designs.
  5. Shrink according to Shrinky Dink instructions. Let cool.
  6. Using string (or clear fishing line would work best) attach the plastic to the earring.
Make ones to show off your team pride, for the next big movie opening, or to express yourself!  

Friday, December 5, 2014

Green Lantern Ornament

"Always winter but never Christmas." -C.S. Lewis, The Lion, the Witch, and the Wardrobe.


It's Friday!!  In celebration of making it through the long work week, I have an easy ornament to make.  You could choose to make the other lantern's and decorate your whole tree this way.

Materials:
-Green Ornament
-White Paint
-Paint Brush

Directions:
1. Paint the outline of a large white circle in the middle of the front of the ornament. 
2. In the center of circle draw an oval and fill it in.
3. Around the oval draw the outline of the lantern.
4. Fill in the outside of the lantern with white paint. Let dry.

Three materials and four steps?  This is an easy craft to wind down the work week.  

Thursday, December 4, 2014

Book Page Vases

"Our hearts grow tender with childhood memories and love of kindred, but we are better throughout the year for having, in spirit, become a child again at Christmas-time." -Laura Ingalls Wilder


These vases are simple to make and a fun center piece.  Plus, you get to drink some wine to make them.  I never complain about that.

Materials:
Wine Bottle
White or Black Spray Paint
Book Pages
Scissors
Pencil
Images to Trace
Mod Podge
Paint Brush

Directions:
1. Spray paint the bottle your desired colored.  Let dry.  I suggest putting the bottle upside down on a dowel and sticking the dowel in a potted plant or a container of rocks to hold it upright.  This helps with the whole spray painting process.
2. Find an image to trace and trace that image onto the book page. 
3. Cut out the image.
4. Put a thin layer of Mod Podge onto the vase where you are going to place the image.  Place the image onto the Mod Podge area and cover with an other layer of Mod Podge.  Be careful not to take the Mod Podge too far out, because this will leave behind a residue.  Let dry.
5. Touch up with paint as needed. 

These vases found their way to my mother and aunt, so I can say they do make a great gift. To make your own flowers check out my August Book Flower post. 

Tuesday, December 2, 2014

Jedi Rebel Ornament

"Blessed is the season which engages the whole world in a conspiracy of love." -Hamilton Wright Mabie

There are 379 days left until the next Star Wars movie comes out.  And yes I looked that up on the countdown calculator for the movie's release. Get ready now by making your Rebel Alliance ornament, so everyone knows which side you are on.  


Materials:
  • Ornament
  • Puff Paint
Directions:
  1. Using the puff paint, paint an upside down arch onto the ornament.  
  2. In the middle of the arch draw a line straight up.  On both sides of this line draw a line down to form a long, but thin triangle shape.
  3. Detail this in with the star image in the center of the triangle.
  4. On each side of the arch create wing shaped objects to match the picture above.


Comic Book Clutch

"The one thing women don't want to find in their stockings on Christmas morning is their husbands." -Joan Rivers

This clutch was not a Christmas present, but did find its way into a care package I sent to one of my Grad school friends this past summer. It is super easy yo make, and could use any picture (or collage) if comic books are not your thing.


Materials:
  • Page from a comic book (or a collage or other photo)
  • Plastic page cover
  • Scissors
  • Sewing Machine
  • Magnet
  • Construction paper if needed
Directions:
  1. Slip the image into the plastic page cover. Add a sheet of construction paper if needed to fill in any uncovered area.
  2. Trim the edge you are going to fold over so the edges are rounded.
  3. Fold into thirds and crease.
  4. Sew staring at the bottom corner so that the two pieces are together, but the third flap is laying out.  Continue sewing up past the end of the two pieces and onto the flap to sew the flap into the plastic and continue around the curves and down to the other corner. This completes the basic clutch.
  5. To create an easy clasp, attach a magnet to the inside of the flap and the inside of the pouch that line up and connect. 

A simple, quick gift that could be personalized to many people on your Christmas list.  The craft could also be altered, and instead of sewing it into a clutch design it could be sewed into a wallet.

Monday, December 1, 2014

T-Shirt produce bag

"Trash: there are no rugs left to sweep it under." -Milwaukee Journal Sentinel

With the Holiday season upon us, I thought it was a nice time to reflect on our own practices for just a moment.  I think often times we will recycle, and you see me reuse on my blog often, but what about reducing. This time of year we often time do not consider the waste that occurs be it from wrapping paper (which can be reused), the huge feasts, or even the crazy amount of packaging wasted on a single toy.  One thing I need to become better at is reducing the number of grocery bags I use.  I own canvas bags, but should truly be better about using them.  The one thing I hadn't done until I made this craft was use a reusable produce bag.  This makes sense to use for my produce and a few of these bags might just come in handy.

Materials:

  • Old T-shirt
  • Scissors
  • Sewing Machine with thread that matches the shirt.
Directions:
  1. Cut the shirt into a rectangle. Cut the side towards the bottom of the shirt so that the two corners are curved. This should result in two pieces.
  2. Sew the two pieces together, leaving an opening on the edge with a straight side.
  3. Cut a big slit in the shirt towards the top about 6 inches long, and an inch in from the straight edge.  This should run parallel with the straight edge.
  4. Move down about 4 inches and start cutting two inch strips, leaving two inches in between in rows parallel to the straight edge.  I recommend using a piece of chalk and drawing the parallel lines on the shirt and them making the cuts in a check board fashion altering which section is open in the row. 
  5. Wash and enjoy your produce bag.

Again this year I am going to try and post a different craft each day counting down to Christmas!  As part of promoting reducing during this time of year, I am going to try and post as many crafts as I can that I have already made or are made from recycled products.  In some cases, both!  Most of these crafts could make good Christmas presents so keep watching for the posts.  

Sunday, October 26, 2014

"Clash of Kings" mini-throne

"A woman's life is nine parts mess to one part magic, you'll learn that soon enough... and the parts that look like magic turn out to be the messiest of all." -George R.R. Martin, A Clash of Kings

I finished A Clash of Kings at least a month ago, but hadn't made a craft for it until now.  This throne is an often find I found while searching the internet.  The original post was made for a phone, but I wanted to make mine a bit bigger to serve dip in for Halloween.  Check out the original post to see the idea, or follow along with my tutorial to make one for yourself.

The Iron Throne

Materials:
  • Foam block
  • 2-3 packs of cocktail swords
  • Hot glue
  • Cardboard
  • Knife
  • Scissors
  • Dark silver spray paint
  • Rocks or something to weigh down the front.
Directions:
  1. Start by cutting the foam block in half, and carve out a square from the inside of the foam.
  2. Cut out a back for the chair, and hot glue that on top of the back part of the carved out foam block.  That completes the base of the throne.
  3. Cut out strips of card board and glue and fold to create the swords on the lower part of the throne.
  4. Glue/stick cocktail swords to the top of the throne and the front of the throne.  
  5. Glue lots of swords to the back of the throne.
    Back of Throne
  6. Use any left over swords to decorate the sides and the front of the bottom part of the throne.  I only had two packs of swords and ran out, so I drew a sword or two onto the sides using the hot glue gun.
    Pre-Painted Throne
  7. Spray paint the throne and let dry.
  8. If your throne will not balance because the back is to heavy, add rocks or some other item to counter weight.  Just tuck them right into the foam.

It is a fairly easy craft that ends up looking impressive!  I think this is how I am going to give out those plastic rings (along with candy) to the trick-or-treaters. More swords would have made it even more awesome.

Wednesday, October 22, 2014

Pumpkin Painting

"I am so glad to live in a world where there are Octobers." -L.M. Montgomery, Anne of Green Gabels


Well trying to get inspired for Halloween, I came across this great painting tutorial on Pinterest.  Jennifer Rizzo's tutorial is one of the best I have come across.  If I can paint something that looks something like a pumpkin, then I think anyone can.

Soda Can Basket

"...much of what was said did not matter, and that much of what mattered could not be said."    -Katherine Boo, Behind the Beautiful Forevers: Life, Death, and Hope in a Mumbai Undercity

This months book club book was Behind the Beautiful Forevers: Life, Death, and Hope in a Mumbai Undercity by Katherine Boo.  This was a great look into life in the Mumbai undercity and the disparities in one of the largest cities in the world.  One of the characters in the book is Abdul, who buys and sells recycling.  His profession inspired this recycling project.


Materials:
  • Soda can
  • Scissors
  • Two different colors of plastic grocery bags
  • Hot glue gun
Directions:
  1. Cut the top off the soda can.
  2. Cut 16 spokes in the can. All the way down to the base of the can.
  3. Cut one long strip out of the grocery bag.  Do the same thing to the other grocery bag.
  4. Tuck the end of the grocery bag strip behind one of the spokes.  Tuck the next grocery bag strip behind the next spoke. 
  5. Weave the strips around the spokes.  Make sure to pull tight for the best basket shape.
  6. Weave up to one inch from the top. Fold the can spokes down over the strips.  
  7. Cut off any excess of the grocery bag strip.  Tuck behind the folded over spoke.
  8. Cut three strips of grocery bag about 6-7 inches long.
  9. Tuck  the ends of the three strips under one of the links of the woven basket (leaving 1-2 inches over hanging).  Do the same on the other side.
  10. Fold the excess strip up, and wrap excess grocery bag strip around to cover the handle.
  11. If you want to decorate the basket, tie a bow (or two) and hot glue them onto the basket.
Enjoy your very recycled basket!